Ashma (Katah)
Ashma (Katah) Recipe from Armenia - Ingredients & Instructions
Introduction
Ashma, also known as Katah, is a traditional bread that boasts a rich history and a unique preparation method. This delicacy is known for its flaky texture and buttery flavor, making it a beloved dish in various cultures. The recipe involves creating thin layers of dough that are meticulously brushed with butter, folded, and rolled to achieve its distinctive texture. This guide will take you through the journey of making Ashma, from its historical roots to serving suggestions, ensuring you can bring this exquisite bread to your table.
History
The origins of Ashma can be traced back to ancient times, where it was a staple in the diets of nomadic tribes. Over the centuries, it has evolved and spread across different regions, each adding its unique twist to the recipe. This bread has been a symbol of hospitality and celebration, often served during special occasions and gatherings. Its preparation, considered an art, was traditionally passed down through generations, preserving the cultural heritage and culinary traditions.
Ingredients
Dough
- 1 lb (454 g) unsalted butter, melted
- 0.25 cup melted crisco
- 2 packages active dry yeast
- 0.5 cup warm water (105°)
- 0.25 tsp sugar
- 3 large beaten eggs
- 2 cup lukewarm whole milk
- 0.5 cup water
- 0.5 cup lukewarm melted crisco
- 2 tbsp salt
- about 3-4 lb (1.81 kg) Gold Medal all-purpose flour (add enough flour to make a soft, smooth dough)
- egg wash (2 well beaten eggs)
- sesame seeds
How to prepare
- Melt the pound of unsalted butter and 0.25 cup of Crisco together. Set aside for brushing the sheets of dough.
- Dissolve yeast in very warm water with 0.25 tsp sugar. Set aside to proof.
- In a large mixing bowl, beat the eggs. Add the milk, water, shortening, and salt. Gradually add the flour and mix well with a large spoon. Mix in the dissolved yeast. Add enough flour to the liquid mixture until it begins to pull together, adding just enough flour to make the dough smooth and pliable. Proceed to knead the dough with your fists, using a small amount of oil on your hands only if the dough is sticking. Divide the dough into six balls. Cover and set in a draft-free area for 15 to 20 minutes.
- Sprinkle flour lightly on the work area. Using a regular rolling pin, roll the first ball of dough into an 8” circle. Using a long dowel, roll the dough out to a 24” circle (or as far as you can go). This dough stretches, so use the back of your hands to gently stretch it to the max. Your ultimate goal is to stretch the dough to a 36” round.
- Brush the entire surface of the dough with melted butter. Fold each side of the circle over to meet in the center, without overlapping. Continue buttering one side of the dough and folding it over until you obtain about an 8” wide strip. Butter the length of the strip and fold loosely into an 8” square. Put the square aside and cover with plastic wrap. Repeat these steps with the rest of the dough.
- Taking the first square, gently fold and smooth back the four corners and shape it into a round. Using the rolling pin, lightly roll and shape the dough to form an 8”x0.5” round disk. Repeat this process with all the squares.
- Place the circles on an ungreased baking sheet without touching, in a draft-free area to rise for about 3 to 4 hours or until doubled in size.
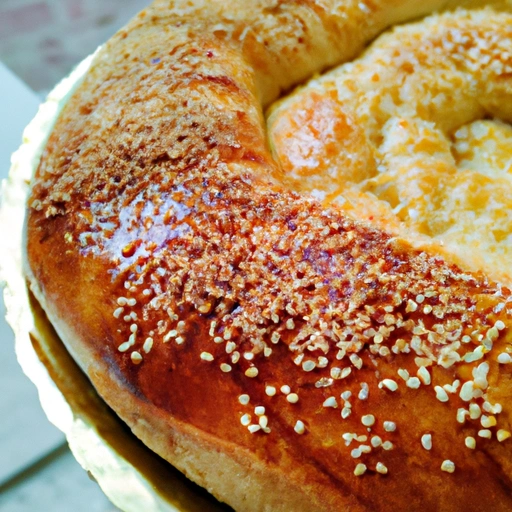
- Preheat the oven to 375°. When the loaves are ready to bake, brush the tops with the 2 beaten eggs (egg wash) and sprinkle with sesame seeds. Bake on the middle rack of the oven for approximately 25 minutes or until light golden in color.
- To serve, cut into wedges and serve warm or at room temperature. To serve warm, wrap in aluminum foil and place in a 375° oven for about 10–12 minutes.
- Note: Another popular variation for shaping this dough is to roll the dough to a 36” sheet and brush it with butter. Gently roll the dough, jellyroll style, into a rope and coil the rope into a round pinwheel, pinching the ends under. Set aside to rise, covered. Using a light touch, with the rolling pin, gently roll each pinwheel and enlarge. Set aside to rise for about 2 hours and bake as above. This is a more uniform loaf, very attractive. However, since it is coiled, it will not rise as high as the former shape. This popular appetizer freezes very nicely for many months.
Variations
- There are several variations of Ashma, including adding herbs or spices to the dough for additional flavor. Some recipes also involve filling the layers with cheese or meats for a heartier dish.
Cooking Tips & Tricks
To achieve the perfect Ashma, consider these tips and tricks:
- Ensure the water is at the right temperature to activate the yeast properly.
- Gradually add flour to the mixture to avoid making the dough too stiff.
- Use a light touch when stretching the dough to prevent tearing.
- Keep the dough covered in a draft-free area to ensure it rises properly.
- Brush each layer of dough generously with melted butter for a flakier texture.
Serving Suggestions
Ashma can be served warm or at room temperature, cut into wedges. It pairs beautifully with tea or coffee and can be a delightful addition to breakfast or as a snack.
Cooking Techniques
The key technique in making Ashma is the careful rolling and folding of the dough to create its layers. This process requires patience and a gentle touch to ensure the layers are distinct and the texture is flaky.
Ingredient Substitutions
For a healthier version, whole wheat flour can be used instead of all-purpose flour. Vegan butter and plant-based milk can substitute for butter and milk for a vegan-friendly option.
Make Ahead Tips
Ashma can be prepared ahead of time and frozen before baking. Simply thaw and bake when ready to serve, ensuring it's always fresh and delicious.
Presentation Ideas
Serve Ashma on a beautiful platter, garnished with fresh herbs or a dusting of powdered sugar for a sweet version. Each piece can be artfully arranged to showcase its flaky layers.
Pairing Recommendations
Ashma pairs well with savory dips such as hummus or tzatziki. For a sweet option, serve with honey or jam. It also complements hearty stews and soups.
Storage and Reheating Instructions
Leftover Ashma can be stored in an airtight container at room temperature for up to two days or refrigerated for longer shelf life. Reheat in the oven to restore its crispiness.
Nutrition Information
Calories per serving
A single serving of Ashma contains a significant amount of calories, mainly due to the butter and Crisco. It's a hearty bread that can be enjoyed in moderation as part of a balanced diet.
Carbohydrates
A serving of Ashma is rich in carbohydrates, primarily from the flour used in the dough. Carbohydrates are essential for energy, making this bread a good source of quick energy.
Fats
The butter and Crisco used in Ashma contribute to its fat content. While it is higher in fats, these ingredients are key to achieving the bread's signature flaky texture and rich flavor.
Proteins
Ashma contains a moderate amount of proteins, mainly from the eggs and milk incorporated into the dough. Proteins are crucial for building and repairing tissues, making this bread a beneficial part of a balanced diet.
Vitamins and minerals
This bread provides various vitamins and minerals, including calcium from the milk and vitamin B from the eggs. These nutrients play vital roles in maintaining healthy bodily functions.
Alergens
Ashma contains common allergens such as gluten, dairy, and eggs. Individuals with sensitivities to these ingredients should consume it with caution or seek alternative recipes.
Summary
Overall, Ashma is a nutrient-rich bread that provides energy, proteins, and essential vitamins and minerals. However, due to its high calorie and fat content, it should be enjoyed in moderation.
Summary
Ashma, with its rich history and delicious flavor, is a testament to the art of bread-making. This guide provides all the information needed to create this traditional bread, from nutritional details to serving suggestions. Whether enjoyed as part of a meal or as a standalone treat, Ashma is sure to delight anyone who tries it.
How did I get this recipe?
I can still remember the exact moment I discovered this recipe for Ashma (Katah). It was a warm summer day, and I was visiting my dear friend Fatma in her quaint little village in Lebanon. Fatma was known throughout the village for her incredible culinary skills, and I was always eager to learn new recipes from her.
As soon as I arrived at Fatma's house, I could smell the delicious aroma of fresh bread baking in the oven. I followed the scent to the kitchen, where Fatma was busy kneading dough for what she called Ashma, a traditional Lebanese dish that she learned from her mother.
Curious and hungry, I asked Fatma if I could help her prepare the Ashma. She smiled warmly and handed me a bowl of flour, water, and yeast. As we worked together, she shared with me the history of this dish and how it had been passed down through generations in her family.
Fatma explained that Ashma, also known as Katah, is a type of flatbread that is made by rolling out dough into a thin sheet, then folding it into layers and baking it in the oven. The result is a crispy, flaky bread that is perfect for dipping in hummus or enjoying with a cup of tea.
As we chatted and worked, Fatma shared with me the secret to making the perfect Ashma. She taught me how to knead the dough just right, so it would be soft and elastic. She also showed me how to roll out the dough thinly and fold it into layers to create the signature flakiness of the bread.
After a few hours of baking and waiting, the Ashma was finally ready. Fatma pulled the hot, golden-brown bread from the oven and cut it into squares. The aroma that filled the kitchen was heavenly, and I couldn't wait to try a piece.
I took a bite of the Ashma and was instantly transported to a place of comfort and warmth. The bread was crispy on the outside and soft on the inside, with a hint of sweetness from the yeast. It was unlike anything I had ever tasted before, and I knew I had to learn how to make it myself.
Before I left Fatma's house that day, she wrote down the recipe for Ashma and handed it to me with a smile. She told me that she hoped I would continue to make this dish and pass it down to future generations, just as she had done.
Since that day, I have made Ashma countless times for my family and friends. Each time I bake this traditional Lebanese bread, I am reminded of the special bond I share with Fatma and the joy of learning new recipes from loved ones.
As I sit here now, surrounded by the familiar scents of flour and yeast in my own kitchen, I am grateful for the memories and traditions that have been passed down to me. And as I take a bite of the warm, flaky Ashma that just came out of the oven, I am filled with a sense of connection to my past and a deep appreciation for the art of cooking.