Checkerboard Cookies
Checkerboard Cookies Recipe - USA
Introduction
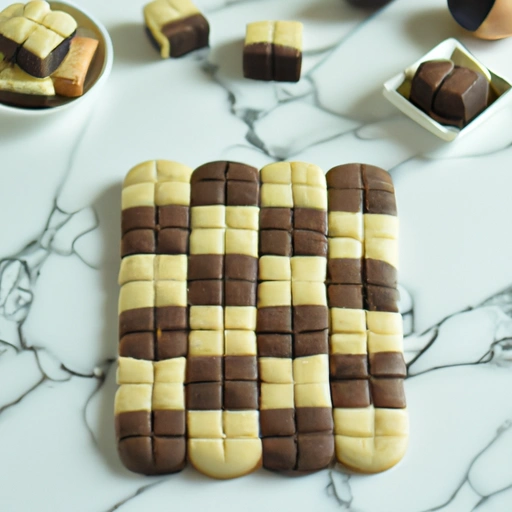
Checkerboard cookies are a classic treat that not only taste delicious but also look impressive with their unique checkerboard pattern. These cookies are perfect for special occasions or as a fun baking project with kids.
History
Checkerboard cookies have been around for centuries and are believed to have originated in Europe. The distinctive checkerboard pattern is achieved by layering and slicing two different colored doughs before baking. This technique creates a visually appealing cookie that is sure to impress.
Ingredients
- 2.75 cups all-purpose flour
- 0.75 cup (1 envelope) nonfat dry milk
- 1 tsp baking powder
- 0.5 tsp salt
- 1 cup (2 sticks) unsalted butter or shortening, softened
- 1 tsp vanilla
- 1.5 cups sugar
- 2 eggs, well beaten
- 2 tbsp cocoa
How to prepare
- For more colorful cookies, substitute red or green food coloring for cocoa.
- Sift together flour, dry milk, baking powder, and salt. Set aside.
- Using an electric mixer, cream the butter and stir in vanilla. Gradually add sugar; beat until light and fluffy.
- Add well-beaten eggs, blending until smooth. Add the dry ingredients and mix until well blended.
- Divide the dough in half. Stir cocoa into one half, blending well. Shape each half into a rectangle, about 2" x 2" x 6". Tightly wrap in waxed paper and chill for at least 30 minutes.
- Unwrap the dough and cut each rectangle into quarters lengthwise. Alternately place dark and white quarters side by side to form a checker design. Rewrap in waxed paper and chill slightly.
- Slice the dough into 0.13 inch pieces and place on an ungreased cookie sheet. Bake at 350° for 12 minutes.
Variations
- Add chopped nuts or chocolate chips to the dough for added texture and flavor.
- Experiment with different colors and flavors by using different food coloring and extracts.
Cooking Tips & Tricks
Make sure to chill the dough before slicing to ensure clean, sharp edges on the cookies.
- For a more vibrant color, use gel food coloring instead of liquid food coloring.
- Experiment with different flavors by adding extracts such as almond or lemon to the dough.
Serving Suggestions
Checkerboard cookies are perfect for serving with a cup of tea or coffee as a sweet snack.
Cooking Techniques
The key to achieving a perfect checkerboard pattern is to carefully layer and slice the dough before baking.
Ingredient Substitutions
You can use butter instead of shortening for a richer flavor.
- Gluten-free flour can be used as a substitute for all-purpose flour for a gluten-free version of these cookies.
Make Ahead Tips
The dough for checkerboard cookies can be made ahead of time and stored in the refrigerator for up to 3 days before baking.
Presentation Ideas
Arrange checkerboard cookies on a platter in a checkerboard pattern for a visually stunning presentation.
Pairing Recommendations
Checkerboard cookies pair well with a glass of milk or a scoop of vanilla ice cream for a delicious dessert.
Storage and Reheating Instructions
Store checkerboard cookies in an airtight container at room temperature for up to one week. They can also be frozen for up to 3 months.
Nutrition Information
Calories per serving
Each serving of checkerboard cookies contains approximately 150 calories.
Carbohydrates
Each serving of checkerboard cookies contains approximately 15 grams of carbohydrates.
Fats
Each serving of checkerboard cookies contains approximately 7 grams of fat.
Proteins
Each serving of checkerboard cookies contains approximately 2 grams of protein.
Vitamins and minerals
Checkerboard cookies are not a significant source of vitamins and minerals.
Alergens
Checkerboard cookies contain dairy (milk) and eggs.
Summary
Checkerboard cookies are a sweet treat that is relatively low in calories but should be enjoyed in moderation due to their sugar and fat content.
Summary
Checkerboard cookies are a fun and delicious treat that is perfect for special occasions or as a sweet snack. With their unique checkerboard pattern and buttery flavor, these cookies are sure to be a hit with family and friends.
How did I get this recipe?
I can still recall the sense of amazement I felt when I first saw the recipe for Checkerboard Cookies. It was many years ago, when I was just a young girl learning the art of cooking from my own grandmother. She was a master in the kitchen, and I always marveled at the delicious dishes she would whip up with such ease.
One day, as I sat at the kitchen table watching her work her magic, she pulled out a tattered old recipe book that had been passed down through generations. She flipped through the pages until she came across a recipe that caught her eye – Checkerboard Cookies. The name alone intrigued me, and I begged her to show me how to make them.
With a twinkle in her eye, my grandmother agreed to teach me the secret to making these unique cookies. She explained that the key to the checkerboard pattern was in the careful layering of two different colored doughs. It sounded complicated, but she assured me that with practice and patience, I could master the technique.
We started by making two separate doughs – one vanilla and one chocolate. My grandmother showed me how to roll each dough into long strips and then carefully stack them on top of each other, alternating between the two colors. With each layer, the checkerboard pattern began to form before my eyes.
As we continued to roll and stack the dough, my grandmother shared stories of how she had learned this recipe herself. She told me that she had first discovered it in a cookbook she had borrowed from a neighbor many years ago. She had been intrigued by the intricate design of the cookies and had spent hours perfecting her technique.
I listened intently as she recounted the trials and errors she had faced along the way. She had burned countless batches of cookies, struggled to get the pattern just right, and even once dropped an entire tray on the floor. But through it all, she never gave up. She was determined to master the art of making Checkerboard Cookies, and her perseverance paid off in the end.
As we finally finished assembling the dough, my grandmother carefully sliced it into thin rounds, revealing the beautiful checkerboard pattern inside. We placed the cookies on a baking sheet and popped them into the oven, eagerly awaiting the final result.
When the cookies emerged from the oven, they were perfect – crisp on the outside, soft on the inside, and with a stunning checkerboard design that made them look almost too beautiful to eat. But of course, we couldn't resist sampling one (or two) right away. The taste was just as delightful as the appearance, with a perfect balance of vanilla and chocolate flavors.
From that day on, Checkerboard Cookies became a staple in our household. Whenever we had a special occasion or simply wanted to treat ourselves, we would whip up a batch of these delicious treats. I perfected my technique over the years, thanks to my grandmother's patient guidance and encouragement.
As I grew older and started my own family, I passed down the recipe for Checkerboard Cookies to my own children. Just like my grandmother had done for me, I showed them the art of rolling, stacking, and slicing the dough to create the intricate pattern. And just like me, they were amazed at the magic of turning simple ingredients into something so beautiful and delicious.
Now, as I look back on those memories with a smile, I am grateful for the gift of learning how to make Checkerboard Cookies from my grandmother. It is a recipe that has brought joy and togetherness to our family for generations, and one that I will always hold dear to my heart. And I hope that one day, my own grandchildren will feel the same sense of amazement and wonder as they learn to make these special cookies, just as I did so many years ago.