Diabetic-friendly New York-style Cheesecake
Diabetic-friendly New York-style Cheesecake Recipe - A Healthy Dessert Option
Introduction
New York-style cheesecake is a classic dessert that is loved by many. This diabetic-friendly version of the recipe allows those with dietary restrictions to enjoy this delicious treat without worrying about their blood sugar levels. With a few simple substitutions and adjustments, you can create a creamy and decadent cheesecake that is perfect for any occasion.
History
The origins of New York-style cheesecake can be traced back to the early 1900s in New York City. This rich and creamy dessert quickly became a favorite among locals and tourists alike, with its dense and smooth texture setting it apart from other types of cheesecake. Over the years, variations of the recipe have emerged, but the classic New York-style cheesecake remains a popular choice for dessert lovers around the world.
Ingredients
- 1.25 cup vanilla wafer crumbs
- 4 tbsp melted margarine
- 1 tsp equal measure or 3 packets equal
- 2 packages (8 oz (227 g) each) softened reduced-fat cream cheese
- 1 package (8 oz (227 g)) softened fat-free cream cheese
- 5.5 tsp equal measure or 18 packets equal
- 2 eggs
- 2 egg whites
- 2 tbsp cornstarch
- 1 cup reduced-fat sour cream
- 1 tsp vanilla
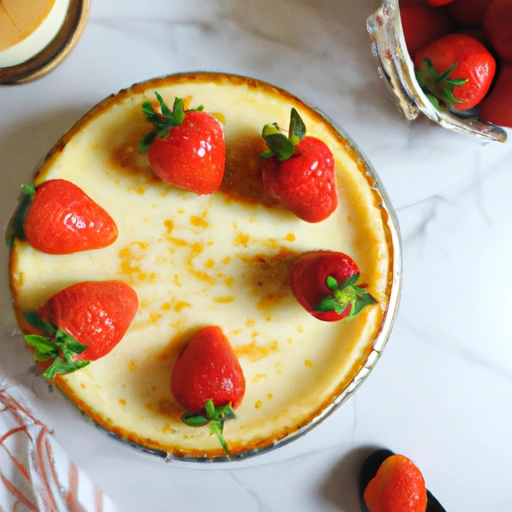
- 1 pt (473 ml) sliced strawberries (optional)
- strawberry sauce
How to prepare
- Mix vanilla wafer crumbs, margarine, and 1 tsp of Equal measure in the bottom of a 9-inch spring-form pan.
- Reserve 1 tbsp of the crumb mixture.
- Pat the remaining mixture evenly on the bottom and 0.5 inch up the side of the pan.
- Bake in a preheated oven at 350°F (177°C) until the crust is lightly browned, about 8 minutes.
- Cool the crust on a wire rack.
- In a large bowl, beat the cream cheese and 5.5 tsp of Equal measure until fluffy.
- Beat in the eggs, egg whites, and cornstarch.
- Mix in the sour cream and vanilla until well blended.
- Pour the mixture into the crust in the pan.
- Place the cheesecake in a roasting pan on the oven rack and add 1 inch of hot water to the roasting pan.
- Bake in a preheated oven at 300°F (149°C) just until set in the center, for 45 to 60 minutes.
- Remove the cheesecake from the roasting pan, sprinkle with the reserved crumbs, and return to the oven.
- Turn the oven off and let the cheesecake cool in the oven with the door ajar for 3 hours.
- Refrigerate for 8 hours or overnight.
- Remove the side of the pan and place the cheesecake on a serving plate.
- Serve with strawberries and strawberry sauce.
Variations
- For a lower-fat version, use reduced-fat cream cheese and sour cream in place of the full-fat versions.
- Experiment with different crust options, such as graham cracker or chocolate cookie crumbs.
- Add a swirl of fruit puree or caramel sauce to the cheesecake batter before baking for a fun twist on the classic recipe.
Cooking Tips & Tricks
Make sure all of your ingredients are at room temperature before starting the recipe. This will help ensure a smooth and creamy texture.
- Be careful not to overmix the batter, as this can lead to a dense and heavy cheesecake.
- To prevent cracks from forming on the surface of the cheesecake, bake it in a water bath. This will help regulate the temperature and prevent the cheesecake from drying out.
- Allow the cheesecake to cool slowly in the oven with the door ajar to prevent it from sinking or cracking.
- For best results, refrigerate the cheesecake for at least 8 hours or overnight before serving.
Serving Suggestions
Serve each slice of cheesecake with a dollop of whipped cream and a sprinkle of cinnamon for a festive touch. You can also garnish with fresh berries or a drizzle of chocolate sauce for added flavor.
Cooking Techniques
Be sure to bake the cheesecake in a water bath to ensure even cooking and prevent cracking.
- Allow the cheesecake to cool slowly in the oven with the door ajar to prevent it from sinking or cracking.
- Refrigerate the cheesecake for at least 8 hours or overnight before serving to allow it to set properly.
Ingredient Substitutions
If you don't have vanilla wafer crumbs, you can use graham cracker crumbs or crushed digestive biscuits instead.
- Instead of margarine, you can use melted butter or coconut oil for the crust.
- Feel free to use your favorite sugar substitute in place of Equal in this recipe.
Make Ahead Tips
You can prepare the cheesecake up to 2 days in advance and store it in the refrigerator until ready to serve. Just be sure to keep it covered to prevent it from drying out.
Presentation Ideas
To make your cheesecake extra special, top it with a layer of fresh fruit or a drizzle of caramel sauce before serving. You can also dust the top with powdered sugar or cocoa powder for a decorative touch.
Pairing Recommendations
This New York-style cheesecake pairs well with a cup of hot coffee or a glass of dessert wine, such as a sweet Riesling or Moscato. For a non-alcoholic option, try serving it with a cup of herbal tea or a glass of milk.
Storage and Reheating Instructions
Store any leftover cheesecake in the refrigerator for up to 3 days. To reheat, allow the cheesecake to come to room temperature before serving, or enjoy it cold straight from the fridge.
Nutrition Information
Calories per serving
250
Carbohydrates
- Total Carbohydrates: 20g
- Dietary Fiber: 1g
- Sugars: 10g
Fats
- Total Fat: 15g
- Saturated Fat: 8g
- Trans Fat: 0g
Proteins
- Protein: 6g
Vitamins and minerals
Vitamin A: 15%
- Vitamin C: 10%
- Calcium: 8%
- Iron: 4%
Alergens
Contains dairy and eggs
Summary
This diabetic-friendly New York-style cheesecake is a delicious dessert option for those looking to indulge without compromising their health. With a moderate amount of carbohydrates and fats, as well as a good source of protein, this cheesecake can be enjoyed in moderation as part of a balanced diet.
Summary
This diabetic-friendly New York-style cheesecake is a delicious and indulgent dessert that can be enjoyed by those with dietary restrictions. With a few simple substitutions and adjustments, you can create a creamy and decadent cheesecake that is perfect for any occasion. Serve it with fresh berries and a drizzle of strawberry sauce for a sweet and satisfying treat.
How did I get this recipe?
The first time I saw this recipe, I was filled with a sense of excitement. It was a beautiful summer day, and I had been rummaging through an old cookbook that I had found tucked away in the back of my pantry. As soon as I saw the words "Diabetic-friendly New York-style Cheesecake," I knew I had stumbled upon something special.
I had always been passionate about cooking, and over the years, I had collected recipes from various places and people. Each recipe held a special place in my heart, but there was something about this particular one that caught my eye. As I read through the ingredients and instructions, I knew that I had to give it a try.
The recipe called for a combination of low-fat cream cheese, Greek yogurt, and a touch of honey to sweeten the cheesecake. It was a healthier twist on the classic New York-style dessert, perfect for those with diabetes or anyone looking to cut back on sugar. I was intrigued by the idea of creating a dessert that was not only delicious but also good for you.
As I gathered the ingredients and preheated the oven, memories flooded back to me of all the times I had spent in the kitchen with my own grandmother. She had been the one to first introduce me to the joys of cooking, teaching me the importance of using fresh, wholesome ingredients and taking the time to craft each dish with care and love.
I carefully followed the recipe, blending the cream cheese and yogurt together until smooth, then adding in the honey and a splash of vanilla extract for flavor. The batter was thick and creamy, just as it should be for a perfect cheesecake. I poured it into a graham cracker crust and popped it into the oven, eagerly anticipating the final result.
As the cheesecake baked, the sweet aroma filled the kitchen, and I couldn't help but feel a sense of pride. I knew that this dessert would be a hit with my family, and I couldn't wait to see their reactions when they took their first bite.
When the timer finally went off, I carefully removed the cheesecake from the oven and let it cool on the counter. The top had turned a beautiful golden brown, and I knew it was ready to be served. I sliced into it, revealing the creamy, luscious filling inside.
I served each piece with a dollop of whipped cream and a sprinkle of fresh berries, the perfect finishing touch to this decadent dessert. As my family gathered around the table to dig in, I watched with joy as their faces lit up with delight.
"This is delicious!" my daughter exclaimed, taking another bite of the cheesecake. "I can't believe it's diabetic-friendly. You've outdone yourself, Grandma."
I smiled, feeling a sense of accomplishment wash over me. Cooking had always been my passion, and being able to share that love with my family through a healthy, delicious dessert was truly fulfilling.
As we sat around the table, savoring each bite of the cheesecake, I knew that this recipe would become a new favorite in our household. It was a testament to the power of good, wholesome ingredients and the joy that comes from sharing a homemade meal with loved ones.
And as I looked down at the empty plates and happy faces around me, I knew that this recipe would hold a special place in my heart for years to come. It was a reminder of the joy that cooking can bring and the memories that can be created around a simple, delicious dish.
So here's to good food, good company, and the joy of sharing a meal with those you love. May this recipe bring as much happiness to your table as it has to mine. Bon appétit!
Categories
| American Recipes | Cheesecake Recipes | Cream Cheese Recipes | Healthy Recipes For Diabetic Friends | Sour Cream Recipes | Strawberry Recipes |