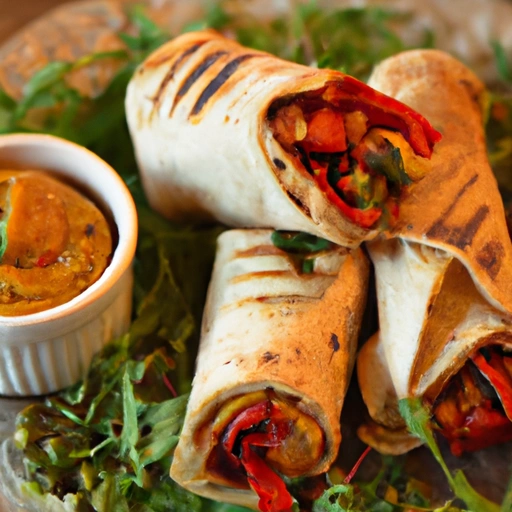
Roasted Red Pepper Wraps
Roasted Red Pepper Wraps Recipe - Delicious Vegetarian Dish
Introduction
Ukrainian Perogies, also known as varenyky, are a traditional Eastern European dish that consists of dough filled with various savory or sweet fillings. These dumplings are typically boiled and then either pan-fried or baked. They are a popular comfort food in Ukraine and are enjoyed by many around the world.
History
Perogies have been a staple in Ukrainian cuisine for centuries. They are believed to have originated in Eastern Europe and have since spread to other countries with Eastern European populations. The dish has evolved over time, with different regions and families adding their own unique twists to the recipe.
Ingredients
- favorite hummus
- 1 piece of flat vegan bread (spinach is the best)
- 0.5 red pepper
- salad greens
- any other veggies that cook well with peppers (onions, mushrooms, etc)
- 1 tbsp olive oil
How to prepare
- 1. Core and dice red peppers and other vegetables being used.
- 2. Stir fry vegetables with olive oil until the skins of peppers look slightly charred. Let the vegetables cool.
- 3. Spread hummus over flat vegan bread.
- 4. When the vegetables are cool, evenly spread the mixture over the hummus, leaving a 2" section at the end of the flat vegan bread with just hummus (this is to ensure the roll will stick).
- 5. Add salad greens.
- 6. Tightly roll the wrap, using toothpicks if needed to keep it together.
- 7. Refrigerate for approximately 1 hour to let the flavors mix, but not too long or else it will become soggy!
- 8. Cut into 4 pieces and enjoy!
Variations
- Instead of the potato and cheese filling, you can try filling the perogies with sauerkraut and mushrooms for a tangy and savory twist.
- For a sweet variation, fill the perogies with a mixture of fruit, such as cherries or blueberries, and a sprinkle of sugar.
Cooking Tips & Tricks
Be sure to let the dough rest for at least 30 minutes to allow it to relax and become easier to work with.
- When rolling out the dough, make sure to keep it fairly thin to ensure that the perogies cook evenly.
- To prevent the perogies from sticking together, be sure to keep them well-floured as you work.
- When pinching the edges of the perogies, make sure to seal them tightly to prevent the filling from leaking out during cooking.
- To prevent the perogies from drying out, cover them with a clean, floured dishcloth as you work.
Serving Suggestions
Ukrainian Perogies are traditionally served with sour cream, fried onions, and crispy bacon bits. They can also be served with a side of sauerkraut or a simple salad.
Cooking Techniques
Boiling is the traditional method of cooking perogies, but you can also pan-fry them in butter for a crispy finish. Baking is another option for a healthier alternative.
Ingredient Substitutions
You can substitute the cheddar cheese with any other type of cheese that melts well, such as mozzarella or gouda.
- Instead of mashed potatoes, you can use mashed sweet potatoes or butternut squash for a different flavor profile.
Make Ahead Tips
You can prepare the dough and filling ahead of time and assemble the perogies just before cooking. Leftover perogies can be stored in the refrigerator for up to 3 days or frozen for up to 3 months.
Presentation Ideas
Serve the perogies on a platter with a dollop of sour cream and a sprinkle of fresh herbs, such as dill or parsley, for a beautiful presentation.
Pairing Recommendations
Ukrainian Perogies pair well with a crisp white wine, such as a Riesling or Sauvignon Blanc. They also go well with a cold beer or a hot cup of tea.
Storage and Reheating Instructions
Leftover perogies can be stored in an airtight container in the refrigerator for up to 3 days. To reheat, simply pan-fry them in butter until heated through and crispy.
Nutrition Information
Calories per serving
Per serving, Ukrainian Perogies typically contain around 250-300 calories, depending on the size and filling of the perogies.
Carbohydrates
Per serving, Ukrainian Perogies typically contain around 30-40 grams of carbohydrates, primarily from the flour in the dough and the potatoes in the filling.
Fats
Per serving, Ukrainian Perogies typically contain around 10-15 grams of fat, primarily from the butter used in the filling and for drizzling over the cooked perogies.
Proteins
Per serving, Ukrainian Perogies typically contain around 5-10 grams of protein, primarily from the cheese and potatoes in the filling.
Vitamins and minerals
Ukrainian Perogies are a good source of vitamin C, vitamin B6, and potassium from the potatoes in the filling. They also contain calcium and vitamin D from the cheese.
Alergens
Ukrainian Perogies contain gluten from the flour in the dough and dairy from the cheese and butter in the filling.
Summary
Overall, Ukrainian Perogies are a balanced dish that provides a good mix of carbohydrates, fats, proteins, and essential vitamins and minerals.
Summary
Ukrainian Perogies are a delicious and comforting dish that is perfect for beginners to try their hand at traditional Eastern European cuisine. With a few simple ingredients and some patience, you can create a flavorful and satisfying meal that will impress your family and friends. Enjoy!
How did I get this recipe?
The first time I saw this recipe, I was immediately intrigued. It was a warm summer day, and I had decided to attend a cooking class with a friend. As we walked into the brightly lit kitchen, the aroma of spices and herbs filled the air, immediately making my stomach growl in anticipation.
The instructor, a lively and passionate chef, greeted us with a warm smile and began to explain that we would be learning how to make Roasted Red Pepper Wraps. As she spoke, I couldn't help but be drawn in by her enthusiasm and knowledge of the ingredients.
She started by showing us how to roast the red peppers over an open flame, turning them until the skins were charred and blistered. The smell of the peppers as they roasted filled the kitchen, and I could already imagine the smoky flavor they would add to the wraps.
Next, she demonstrated how to peel the peppers, removing the charred skin to reveal the tender flesh underneath. It was a messy process, but the end result was worth it. The peppers were then sliced into strips and set aside to cool.
While the peppers cooled, the chef moved on to the next step: preparing the filling for the wraps. She sautéed onions and garlic in olive oil until they were golden and fragrant, then added a mixture of cooked quinoa, black beans, and corn. The filling was seasoned with cumin, paprika, and a touch of cayenne for a subtle kick of heat.
Once the filling was cooked through, the chef assembled the wraps. She spread a generous spoonful of the quinoa mixture onto a warm flour tortilla, then topped it with the roasted red pepper strips. A sprinkle of fresh cilantro and a squeeze of lime juice added the finishing touches.
As I took my first bite of the Roasted Red Pepper Wrap, I was immediately transported to a world of flavor. The smoky peppers paired perfectly with the earthy quinoa and beans, creating a dish that was both satisfying and delicious. I knew that I had to learn how to make this recipe at home.
After the class was over, I asked the chef for the recipe, and she graciously shared it with me. I made a mental note of the ingredients and instructions, eager to recreate the dish in my own kitchen.
Over the following weeks, I practiced making the Roasted Red Pepper Wraps, tweaking the recipe to suit my own tastes. I added a dollop of creamy avocado sauce and a sprinkle of crumbled feta cheese for an extra burst of flavor. Each time I made the wraps, my family and friends raved about how delicious they were.
As I continued to cook and experiment with new recipes, the Roasted Red Pepper Wraps became a staple in my repertoire. I would often make them for family gatherings and potluck dinners, where they were always a hit.
Years passed, and the recipe became a cherished part of my culinary repertoire. I shared it with friends and neighbors, passing on the tradition of making Roasted Red Pepper Wraps to the next generation.
Now, as I sit in my kitchen, preparing a batch of the wraps for a family dinner, I can't help but smile as I remember the first time I learned how to make this recipe. It's a reminder of the joy and passion that cooking brings into my life, and the connections that are formed through sharing delicious food with loved ones.
As I take a bite of the warm, flavorful wrap, I am filled with a sense of contentment and gratitude. The recipe may have been passed down to me by a talented chef, but it is now a part of my own culinary journey, a reminder of the love and dedication that goes into every dish I create.
And as I finish my meal, I know that the tradition of making Roasted Red Pepper Wraps will continue for generations to come, bringing joy and deliciousness to all who taste them.