Homemade Kadaif
Homemade Kadaif Recipe with Yogurt, Eggs, Sugar, and Vanilla
Introduction
Homemade Kadaif is a delicious and traditional dessert that is popular in many Middle Eastern and Mediterranean countries. This sweet treat is made with a unique shredded pastry dough that is soaked in a sweet syrup, making it a perfect dessert for any occasion.
History
Kadaif has a long history that dates back to the Ottoman Empire. It is believed to have originated in Turkey and has since spread to many other countries in the region. The dessert is typically served during special occasions such as weddings, holidays, and celebrations.
Ingredients
How to prepare
- Mix the baking soda into the yogurt. Add the mentioned ingredients one by one and prepare the dough.
- With hands coated in melted butter, take pieces of the dough and shape them into ovals about the size of a walnut. Place them on a baking pan greased with butter, leaving space between each piece of dough.
- Cover the pieces of dough with beaten eggs, sprinkle sugar on top, and bake in a medium-heat oven.
Variations
- Add chopped nuts such as pistachios or walnuts to the dough for added texture and flavor.
- Drizzle honey or a flavored syrup over the baked Kadaif for an extra touch of sweetness.
- Serve with a sprinkle of cinnamon or powdered sugar on top for a decorative finish.
Cooking Tips & Tricks
Make sure to mix the baking soda into the yogurt thoroughly to ensure that the dough rises properly.
- When shaping the dough into ovals, make sure to coat your hands in melted butter to prevent sticking.
- Be sure to leave enough space between each piece of dough on the baking pan to allow for even baking.
- To achieve a golden brown color on top, be sure to cover the pieces of dough with beaten eggs before baking.
Serving Suggestions
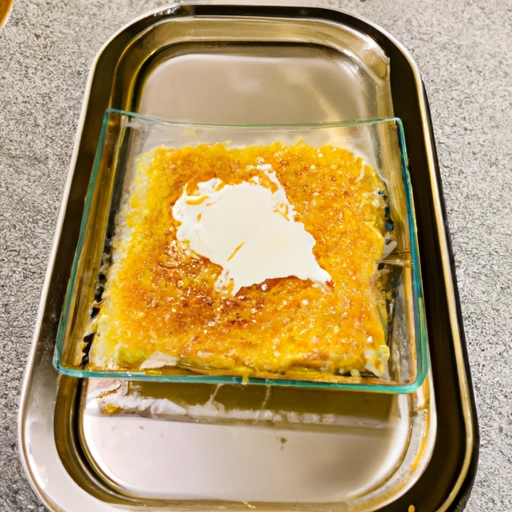
Homemade Kadaif can be served warm or cold, and is often enjoyed with a scoop of vanilla ice cream or a dollop of whipped cream on top.
Cooking Techniques
Be sure to mix the baking soda into the yogurt thoroughly to ensure that the dough rises properly.
- When shaping the dough into ovals, coat your hands in melted butter to prevent sticking.
- Cover the pieces of dough with beaten eggs before baking to achieve a golden brown color on top.
Ingredient Substitutions
You can use Greek yogurt or sour cream as a substitute for regular yogurt in this recipe.
- Margarine can be used instead of butter if desired.
- Lemon zest can be used in place of lemon packs for added flavor.
Make Ahead Tips
Homemade Kadaif can be made ahead of time and stored in an airtight container in the refrigerator for up to 3 days. Simply reheat in the oven before serving.
Presentation Ideas
Serve Homemade Kadaif on a decorative platter with a dusting of powdered sugar and a sprig of fresh mint for a beautiful presentation.
Pairing Recommendations
Homemade Kadaif pairs well with a cup of hot tea or coffee for a delightful dessert experience.
Storage and Reheating Instructions
Store any leftover Homemade Kadaif in an airtight container in the refrigerator for up to 3 days. Reheat in the oven at a low temperature until warmed through before serving.
Nutrition Information
Calories per serving
Each serving of Homemade Kadaif contains approximately 300 calories.
Carbohydrates
Each serving of Homemade Kadaif contains approximately 45 grams of carbohydrates.
Fats
Each serving of Homemade Kadaif contains approximately 12 grams of fats.
Proteins
Each serving of Homemade Kadaif contains approximately 5 grams of proteins.
Vitamins and minerals
Homemade Kadaif is not a significant source of vitamins and minerals.
Alergens
Homemade Kadaif contains dairy (yogurt, butter, eggs) and gluten (flour).
Summary
Homemade Kadaif is a sweet and indulgent dessert that is high in carbohydrates and fats. It is best enjoyed in moderation as part of a balanced diet.
Summary
Homemade Kadaif is a delicious and traditional dessert that is perfect for any occasion. With its unique shredded pastry dough and sweet syrup, this dessert is sure to be a hit with your family and friends. Enjoy!
How did I get this recipe?
The memory of finding this recipe for the first time brings a smile to my face. It was a warm summer day many years ago, and I was visiting my cousin Maria in her quaint little village in Greece. Maria was known for her amazing cooking skills, and I always looked forward to learning new recipes from her whenever I visited.
On this particular day, Maria invited me into her kitchen and handed me a worn, stained piece of paper with the recipe for homemade Kadaif written in her beautiful handwriting. She told me that this recipe had been passed down through generations in our family, and she wanted me to carry on the tradition.
I was thrilled to learn how to make this delicious dessert, as I had always been a fan of Kadaif but had never attempted to make it myself. Maria patiently guided me through each step, from preparing the shredded phyllo dough to making the sweet syrup that would be poured over the finished dish.
As we worked together in the kitchen, Maria shared stories of our ancestors who had also been skilled cooks and bakers. She told me about how our great-grandmother used to make Kadaif for special occasions, and how she would always be surrounded by family and friends eager to taste her creations.
I felt a deep sense of pride as I stirred the ingredients and watched as the Kadaif began to take shape. The sweet aroma of cinnamon and nutmeg filled the air, and I knew that this recipe would soon become a staple in my own kitchen.
After hours of preparation, the Kadaif was finally ready. Maria and I sat down at the kitchen table, eager to taste our creation. The first bite was pure bliss – the crispy, golden strands of phyllo dough paired perfectly with the sweet, sticky syrup. I felt like I had unlocked a secret family recipe that would bring joy to generations to come.
As I left Maria's village and returned to my own home, I carefully tucked the recipe for homemade Kadaif into my recipe book. Over the years, I would make this dessert for countless family gatherings and celebrations, always receiving compliments and requests for the recipe.
I cherished the memories of learning how to make Kadaif with Maria, and the bond that we shared over our love of cooking. The recipe itself was a treasure, a link to my past and a symbol of the traditions that had been passed down through my family for generations.
Now, as I stand in my own kitchen preparing a batch of homemade Kadaif, I can't help but think back to that summer day in Greece when I first discovered this recipe. It brings me joy to know that I am carrying on a tradition that has brought so much happiness to my family – and that one day, I will pass it on to future generations, just as Maria did for me.
Categories
| Kadaif Recipes | Yogurt Recipes |